
Docs navigation
Get started
AI agents
Connect
Operate
Day to day
When it breaks
Govern access
Team & account
Access
Identity concepts
Provider guides
Account
JumpCloud
Connect JumpCloud to emisar: one custom application carries OIDC sign-in and directory provisioning together.
- A JumpCloud administrator.
- An emisar owner or admin.
Single sign-on#
Connecting an identity provider is a paid feature. Only available on Team & Enterprise.
-
1
In emisar
Start the connection.
Open Team → Single sign-on → Add connection and choose JumpCloud. Leave the page open: the callback URL on it is what JumpCloud asks for next, and JumpCloud's values come back here at the end.
emisar · Add connectionPicking the provider here tailors the rest of the form to it. -
2
In JumpCloud
Open SSO Applications.
In the JumpCloud Admin Portal go to Access → SSO Applications and press Add New Application.
-
3
In JumpCloud
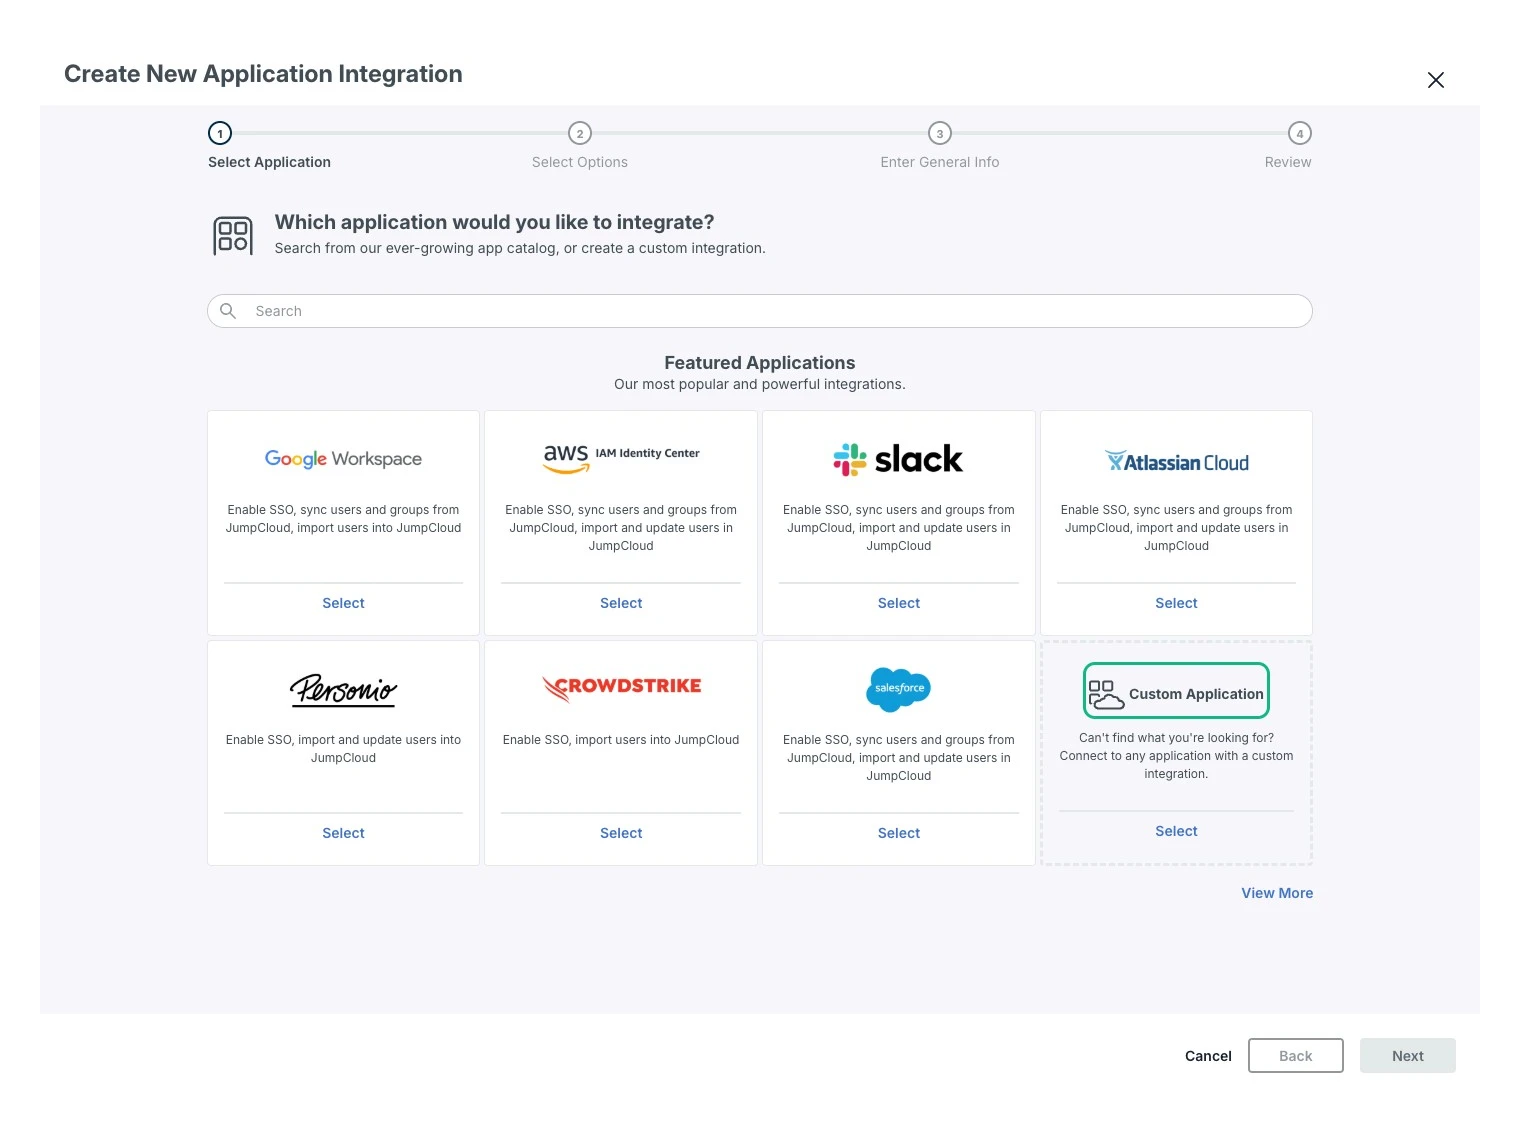
Choose Custom Application.
emisar is not in JumpCloud's catalog, so scroll past the featured tiles to Custom Application, press its Select, then Next.
JumpCloud · Select ApplicationThe Custom Application tile sits last, after the catalog's featured integrations. -
4
In JumpCloud
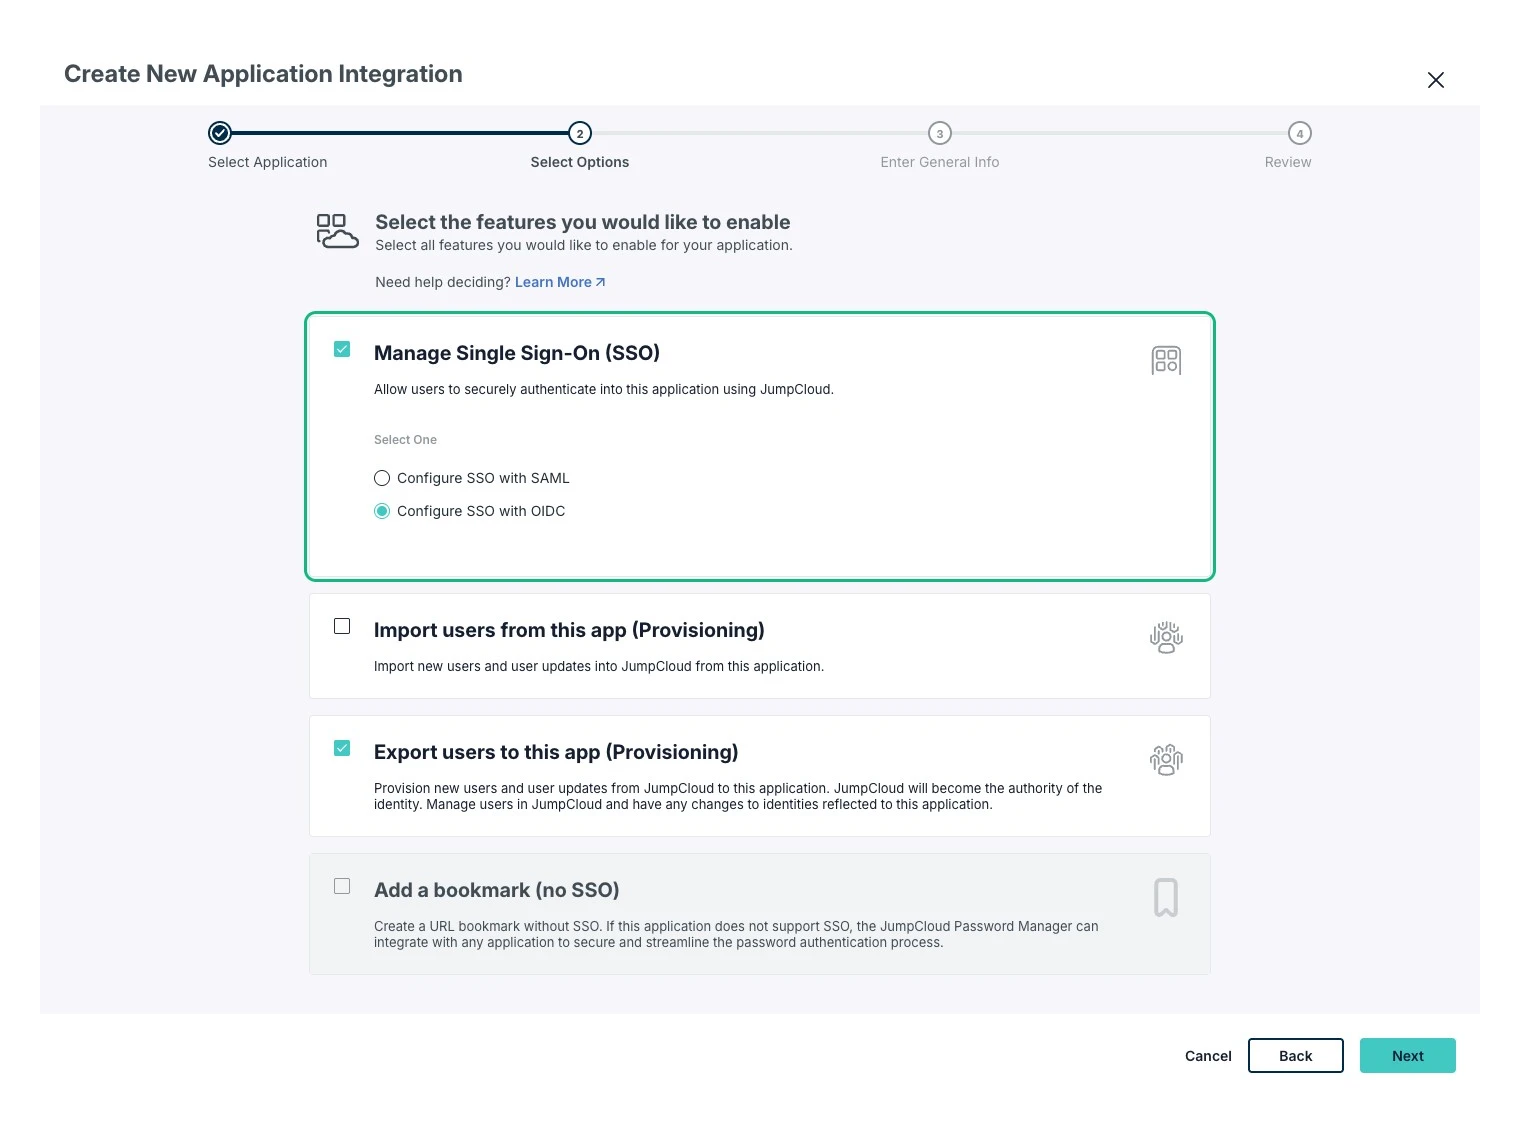
Enable SSO, and pick OIDC.
Tick Manage Single Sign-On (SSO). That reveals a Select One pair beneath it — choose Configure SSO with OIDC. The form defaults to SAML, but emisar uses OIDC. Select Configure SSO with OIDC now because changing this choice later is difficult.
If you also want directory sync, tick Export users to this app (Provisioning) on this same step — JumpCloud carries both on one application. Leave Import users from this app off. That direction pulls users into JumpCloud.
JumpCloud · Select OptionsSSO with OIDC and Export users, together on one application. Import users stays off — it points the wrong way. -
5
In JumpCloud
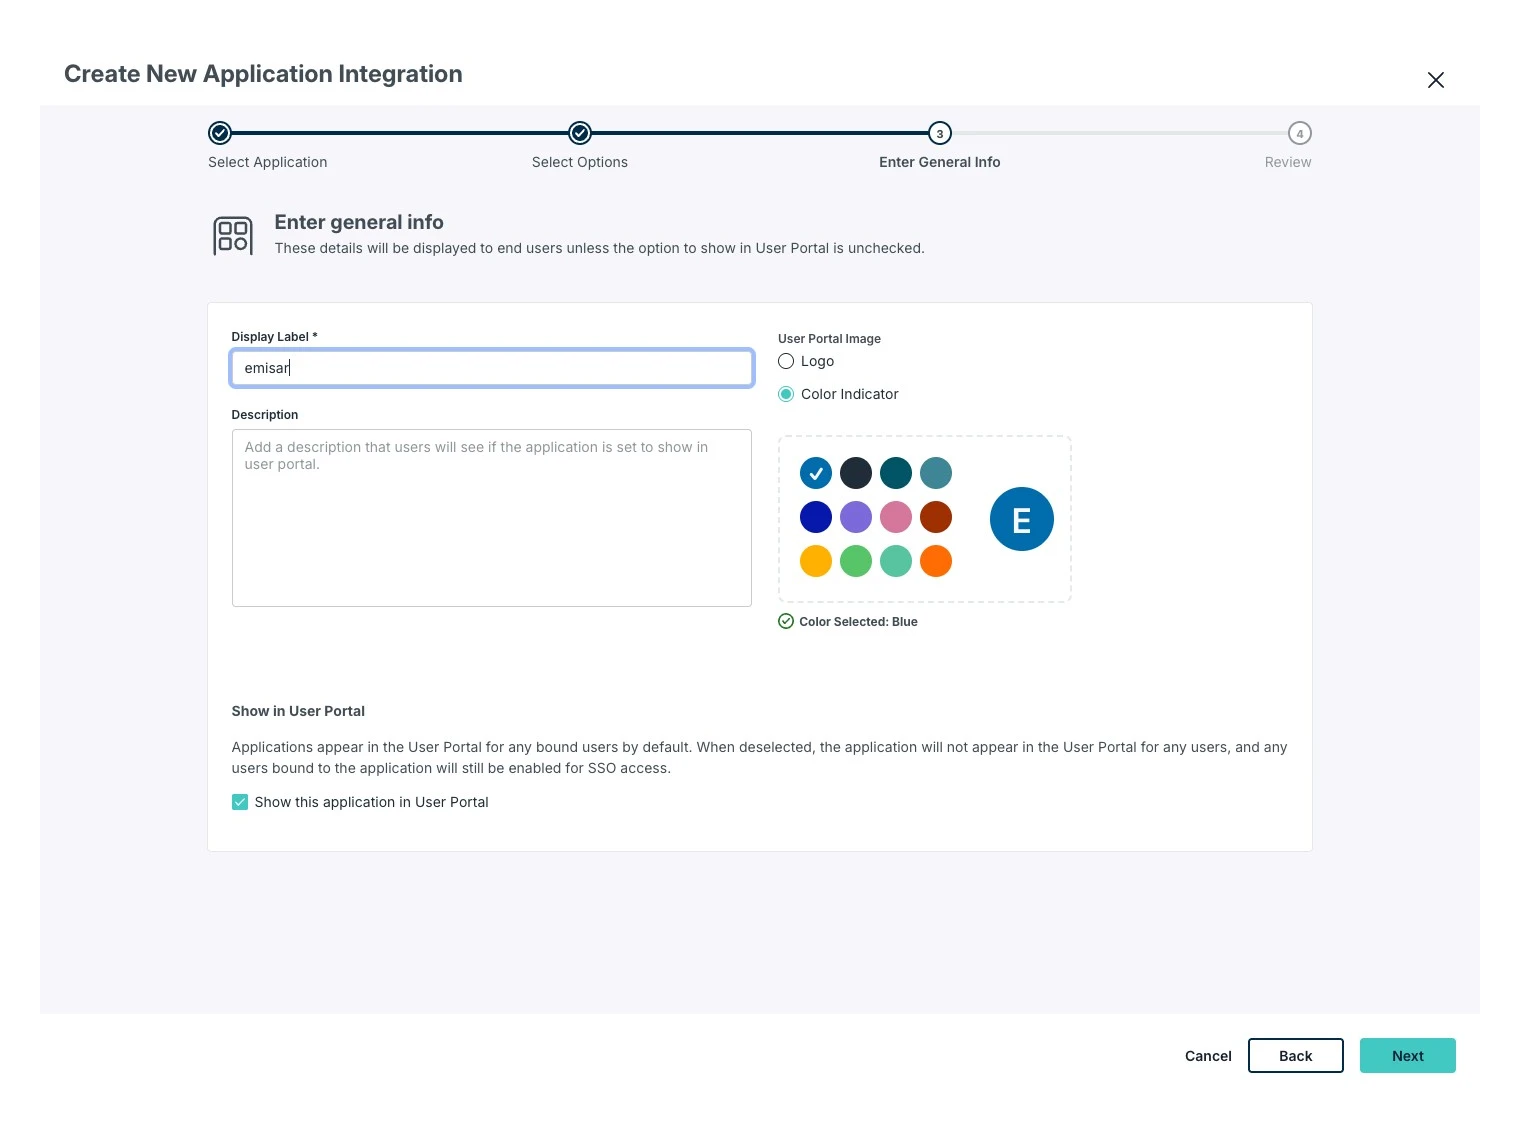
Name it.
Display Label is what your people see in the JumpCloud User Portal —
emisaris the obvious choice. Everything else on this step is cosmetic.JumpCloud · Enter General InfoOnly Display Label is required. -
6
In JumpCloud
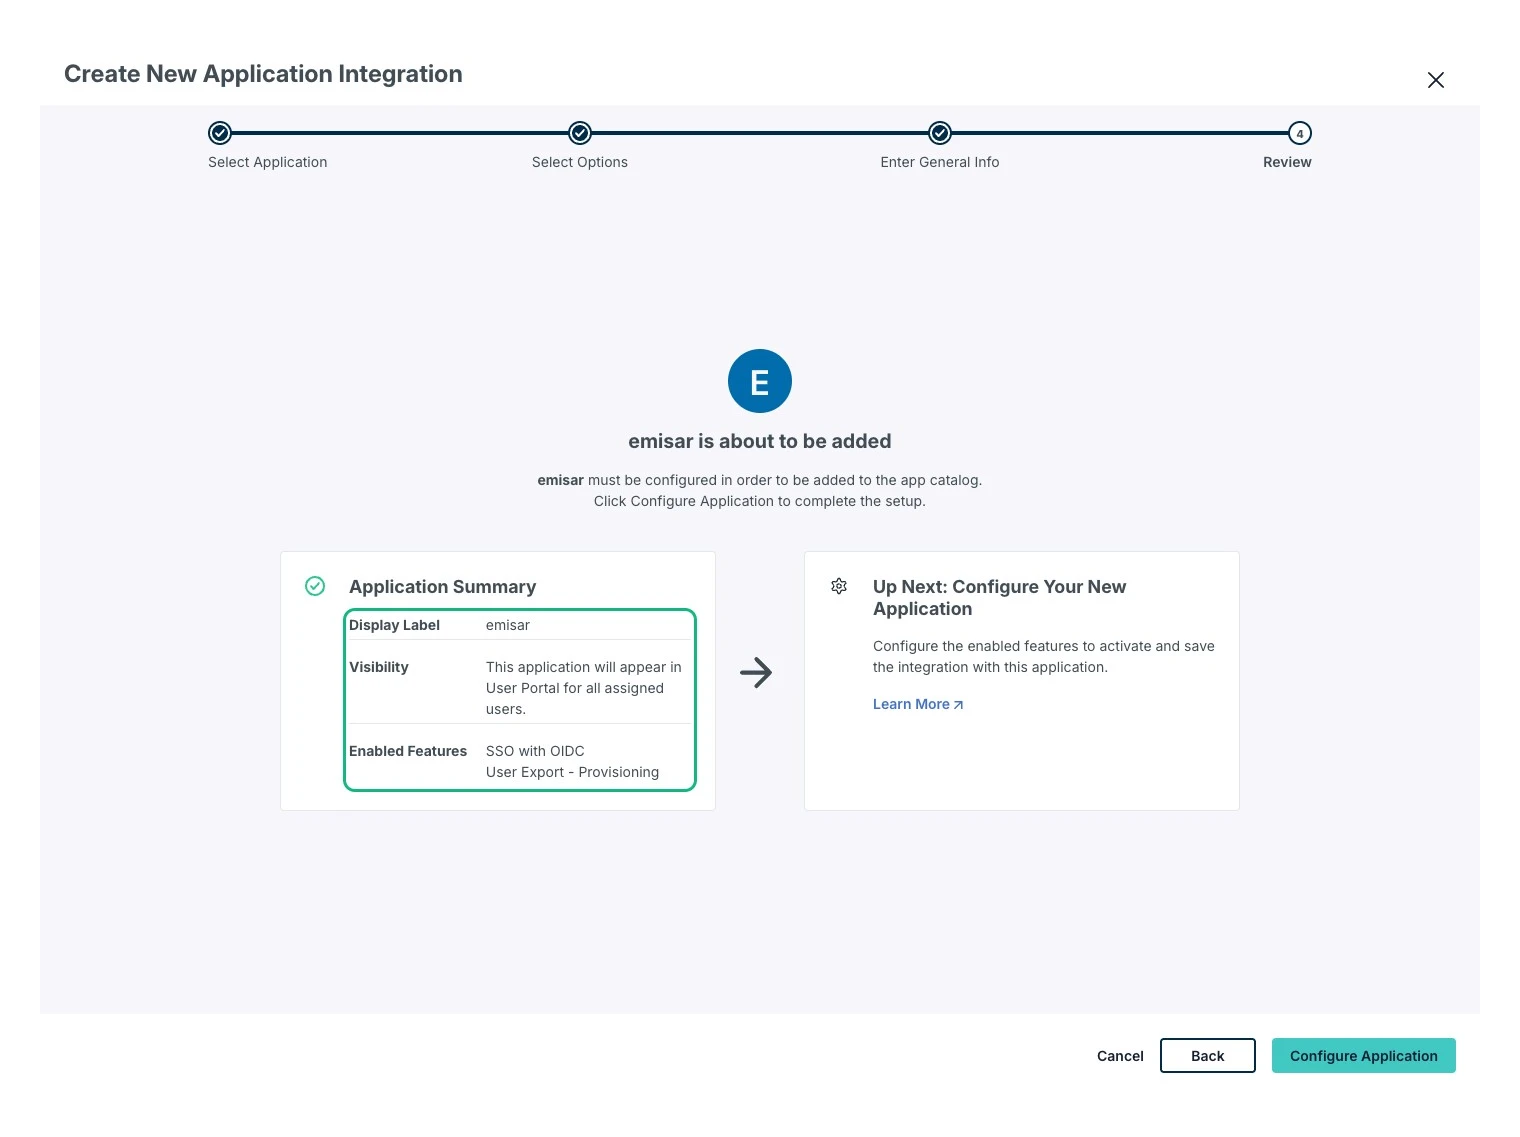
Check the summary, then configure.
Enabled Features must list SSO with OIDC. It also lists User Export - Provisioning when selected. If the list says SAML, go Back and change the radio. emisar cannot use a SAML connector. Then select Configure Application.
JumpCloud · ReviewEnabled Features is the check that the OIDC radio actually took. -
7
In JumpCloud
Set the redirect URI, then activate.
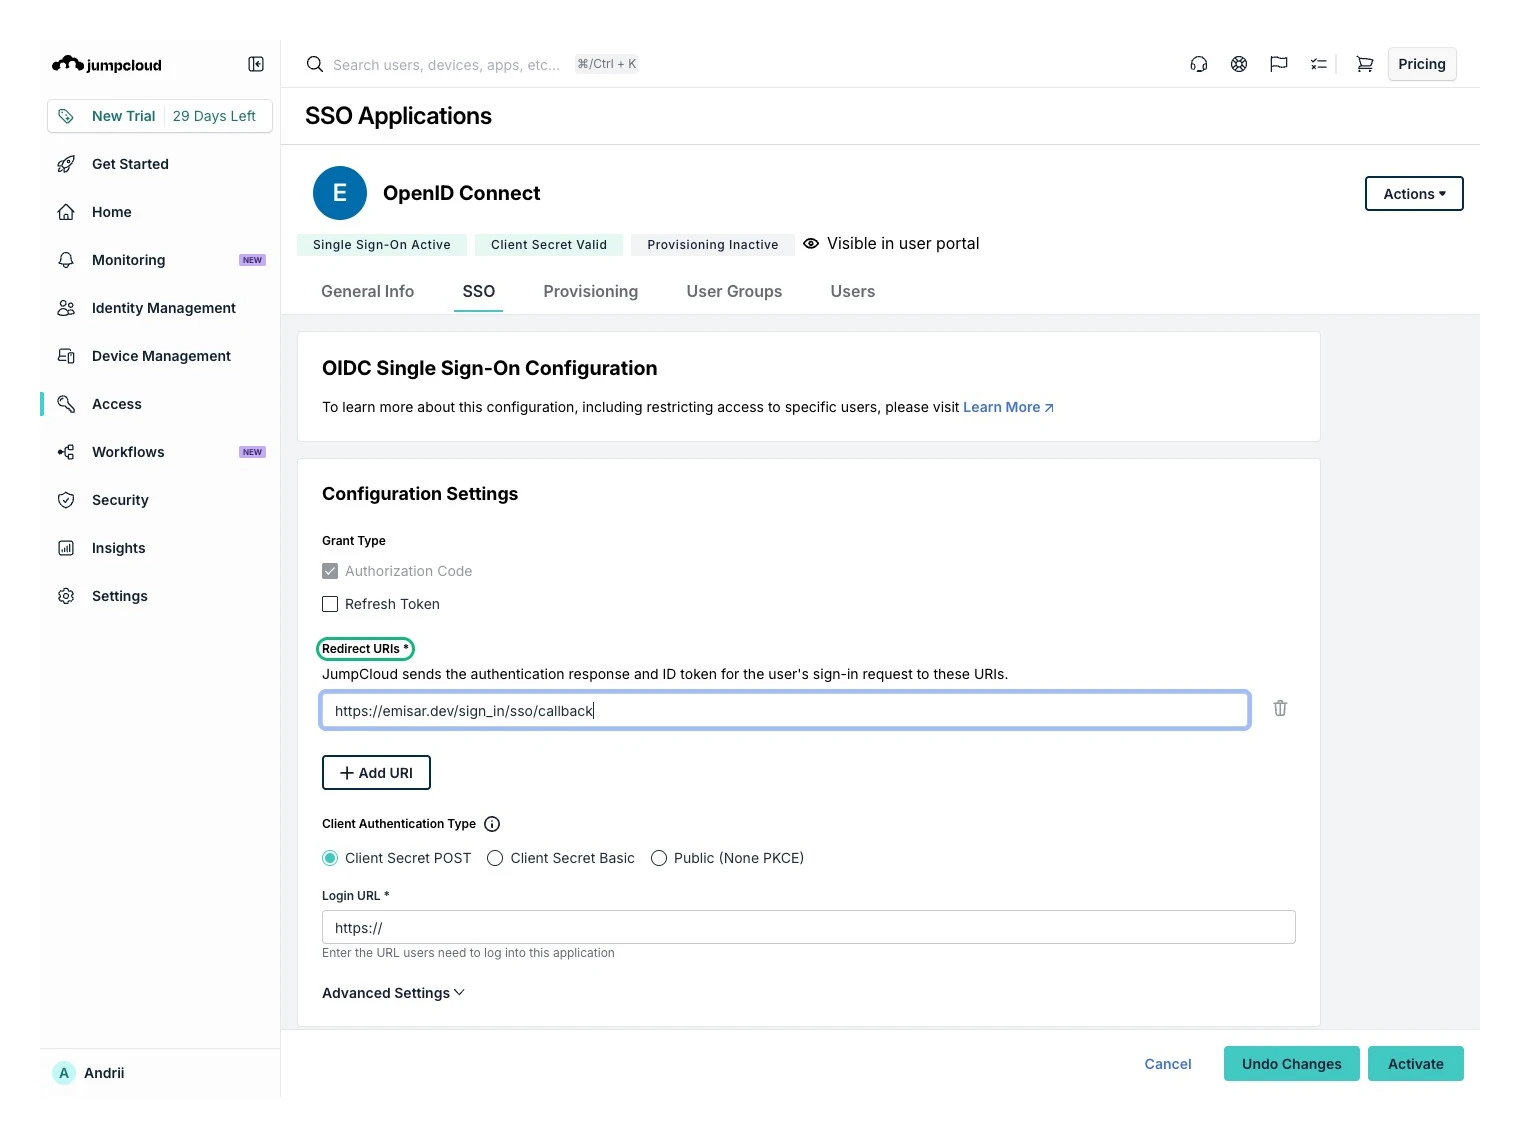
On the application's SSO tab, put emisar's callback in Redirect URIs:
Redirect URI
https://emisar.dev/sign_in/sso/callbackLeave Authorization Code as the grant type. Either Client Secret POST or Client Secret Basic works — emisar accepts both. Set Login URL to
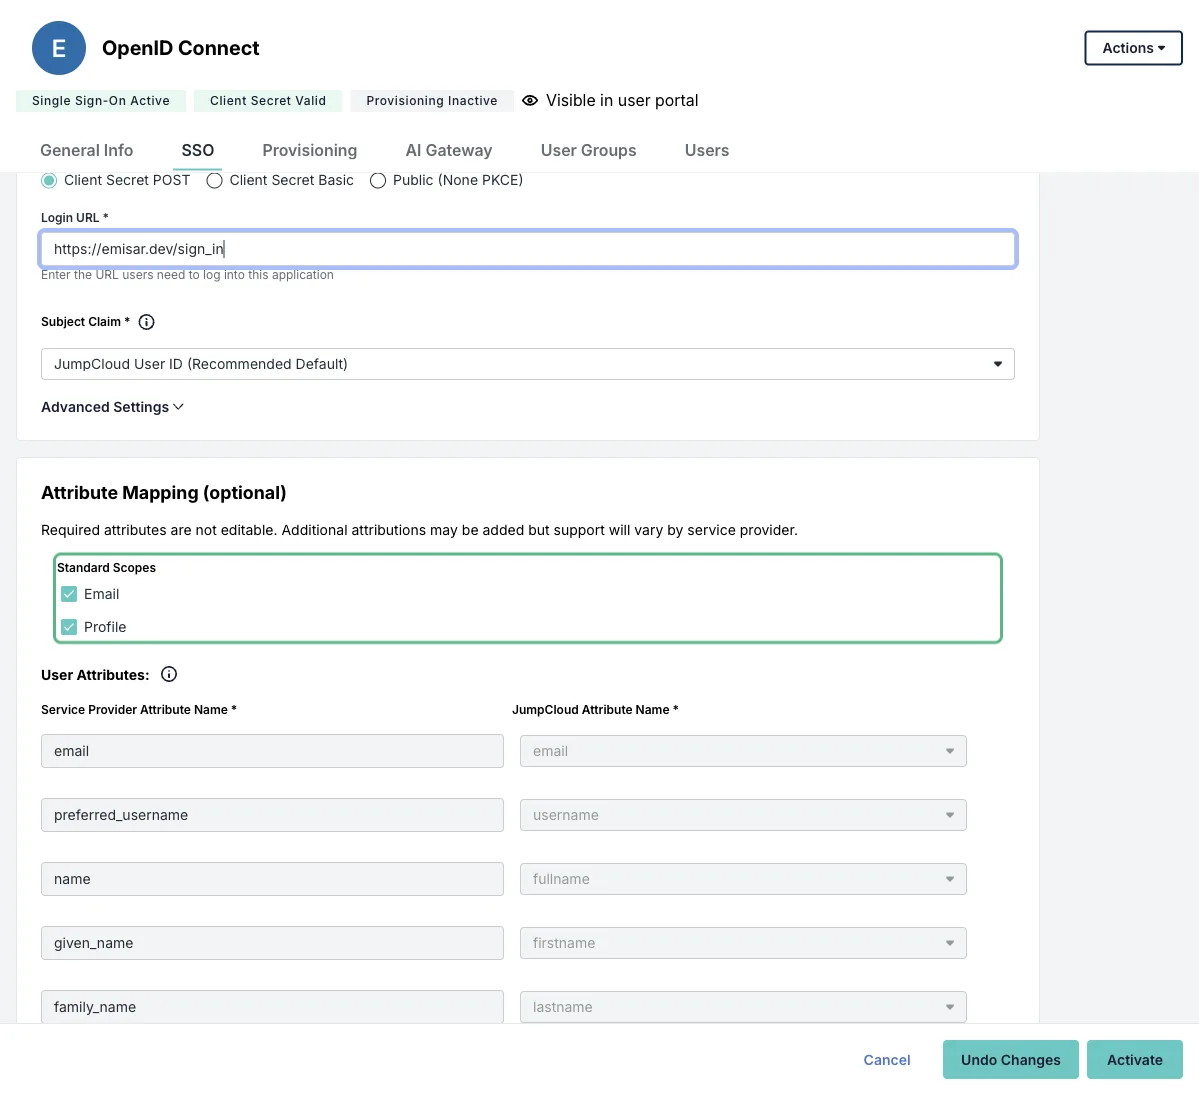
https://emisar.dev.JumpCloud · OIDC Single Sign-On ConfigurationRedirect URIs takes emisar's callback verbatim; Login URL uses the public emisar host. Under Attribute Mapping → Standard Scopes, select Email and Profile. Email adds the
emailandemail_verifiedclaims emisar checks before joining sign-in to a synced user. Profile supplies the display-name claims. Then press Activate.JumpCloud · OIDC Attribute MappingEmail and Profile must both be selected before activation. -
8
In emisar
Paste the two values it reveals.
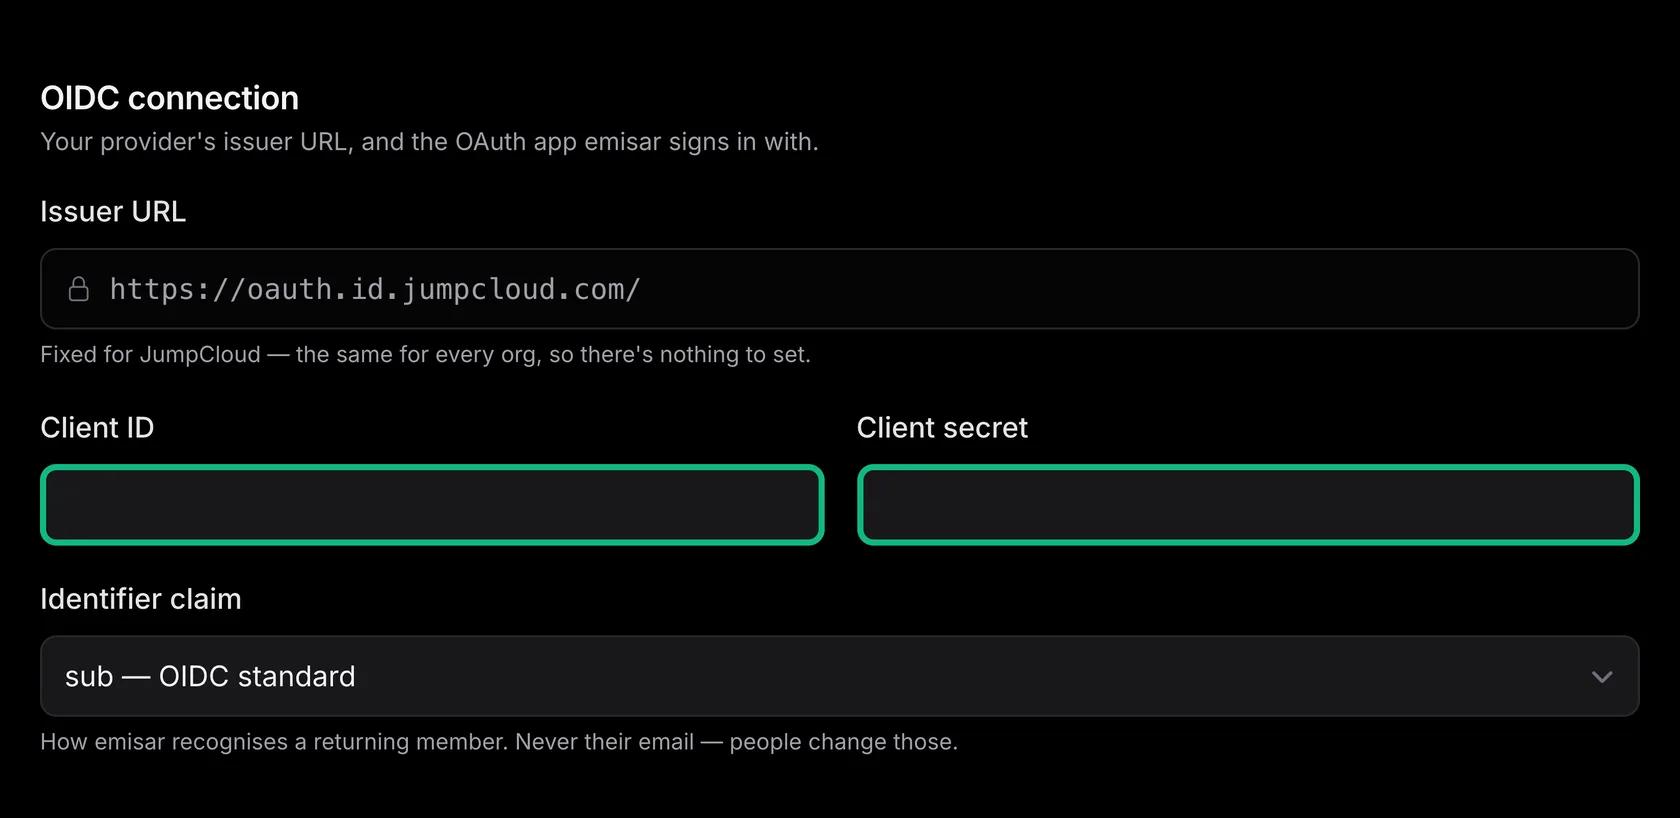
Activating shows the Client ID and Client Secret. In emisar, select the JumpCloud region your organization uses: United States, Europe, or India. Paste the client ID and secret, then select Add connection.
- United States
-
https://oauth.id.jumpcloud.com/ - Europe
-
https://oauth.id.eu.jumpcloud.com/ - India
-
https://oauth.id.in.jumpcloud.com/
Select Verify sign-in and complete the identity checks. After verification, select Enable for members and confirm.
emisar · Add connectionChoose your JumpCloud region and paste the client ID and secret.

This guide covers only the provider-specific fields. Single sign-on explains provisioning, default roles, runner access, and provider MFA settings.
Directory sync#
If you ticked Export users to this app (Provisioning) on step 3, this same application pushes your directory — there is no second connector to create.
You need the connection's SCIM base URL and bearer token — enabling directory sync shows where both come from. Only available on Enterprise.
-
1
In JumpCloud
Point its Provisioning tab at emisar.
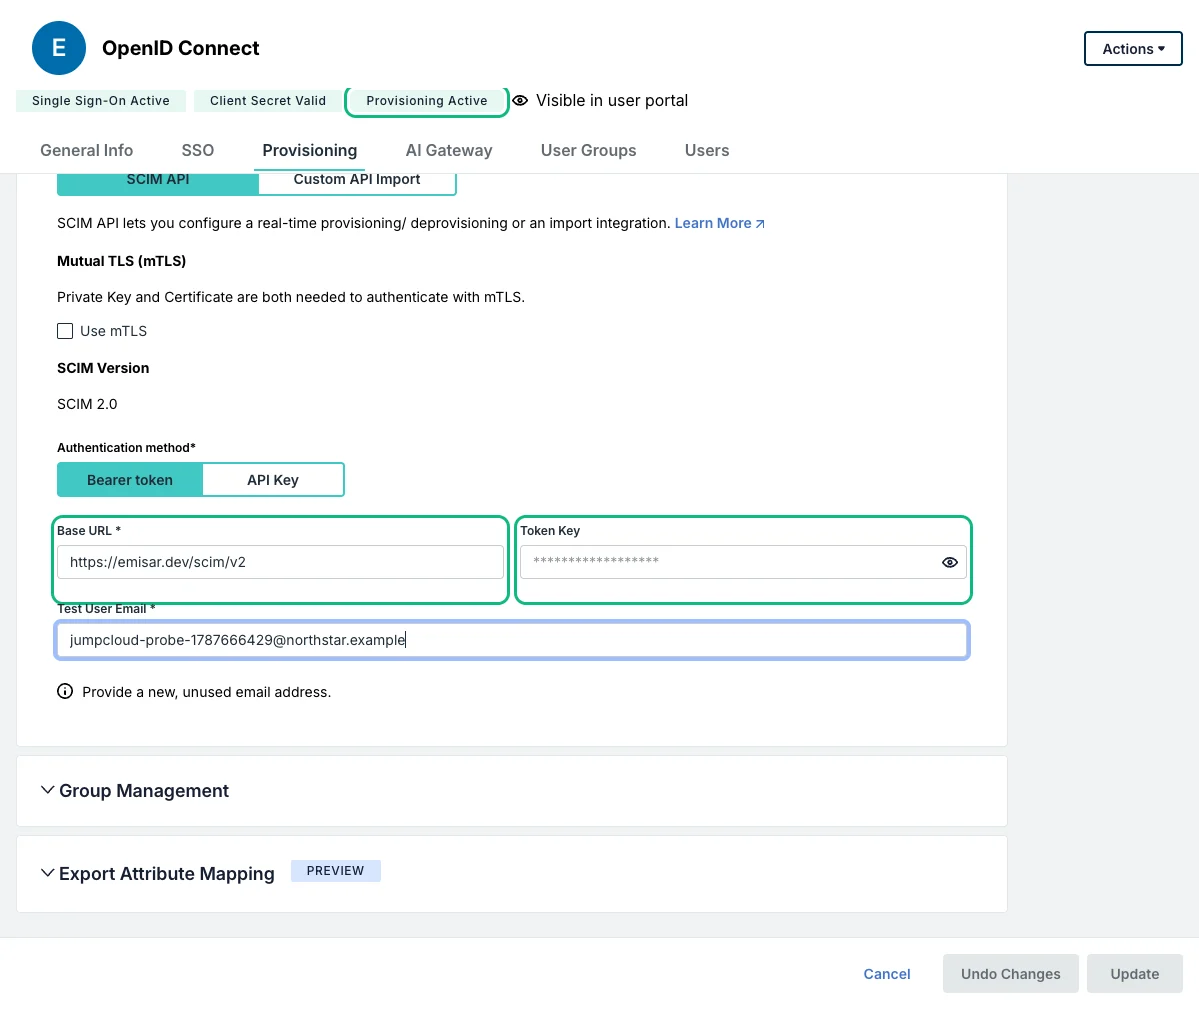
Open the saved application's Provisioning tab. JumpCloud also calls it Identity Management. The SCIM version is fixed at 2.0. Set Authentication method to Bearer token. Enter the SCIM base URL as Base URL. Enter the bearer as Token Key. Test User Email must not already exist in emisar. JumpCloud creates and deletes this user during the live check. An existing member causes activation to fail.
-
2
In JumpCloud
Test Connection, then Activate.
Press Test Connection, then Activate. Activation creates, renames, and deletes a probe group. It also provisions and removes the test user from your live emisar account. Do not press Save. JumpCloud discards the configuration and makes you start over. The probe group can omit
externalId. emisar returns the id used for the rename and delete.JumpCloud · ProvisioningThe accepted configuration reports Provisioning Active; the bearer remains masked. Then bind the people you want synced: the app's User Groups tab decides who is in scope. Members appear under Members on the emisar connection, and their JumpCloud groups become mappable to roles below.
When sign-in and the directory disagree#
emisar binds a synced member to the directory externalId, or to
userName
when externalId is
missing. A sign-in binds to the
sub
claim. When those values differ, emisar cannot prove both records belong to one person. It
holds the sign-in for an administrator instead of guessing.
You do not have to make them match. A sign-in the directory has not claimed lands in Pending access requests under Team, with the identifier it presented. One approval binds the sign-in to the member that the directory already synced. Both identifiers stay on one record. Later sign-ins and directory updates find the same member. This approval happens once, at the person's first sign-in.
Check the first request carefully. It shows the email JumpCloud asserted. Members under Team → Single sign-on shows the directory record. Confirm both show the same person. If they differ, do not approve the request. The connector is misconfigured.
Next: configure Role mapping so directory groups grant the right Emisar role.